Hello all, I have a fantastic and simple project for you today. May Arts Ribbon Blog is having another design team call. They have requested 3 projects using ribbon with one of the projects also having a tutorial. This is my first project including a tutorial.
First decide the length you want to make the braided part of your belt. My belt braid is 26". Second measure and cut your ribbon. Take the measurement you need for the braid (26") and multiply that number by 4.5. This equals 117 inches. To make the braid you will need two pieces of ribbon this same length. You can find a video on how to make this braid here.
Before you finish off the end of the braid, thread the braid through the belt loops in the pants just to make sure where you want to stop the braid and then cut the ribbon and hot glue the ends.
Third measure and cut single strands of ribbon to desired length and hot glue them to the ends of your belt so you can tie it. You could also hot glue them around some kind of a belt buckle as well.
Last, decide which if any embellishments you want and hot glue them to the belt. I used buttons and cut the loop off the back in order to hot glue them flat on the belt.
And there you have it! A beautiful braided ribbon belt sure to please its owner!
My cute girls on Easter. I wanted to do something a bit different and this is what I came up with. It's a spin off a hair-do design I saw on http://www.princesshairstyles.com/
What girl doesn't love dolls? I admit there are a few that probably don't, but my girls do. I'm sure you have all seen the 18" American Girl Dolls. Wow, they cost a pretty penny and so does the furniture and clothes etc. My girls have a few 18" dolls from New generation etc., and of course love to have clothes and furniture for them.
Here is a very cost effective way to add a doll trunk to your daughters collection that they will absolutely love.
Believe it or not, I got this trunk for $7.00. Yup, you heard me right. Of course, it was plain wood with rope handles, but hey it had potential. I don't know about you but I looooooooove
May Arts hot pink and black combo ribbons, and that's where it all began.
First I painted the wooden box black, and took out the rope handles.
YD93 1.5"x25y - GROSGRAIN/CENTER POLKA DOT BAND
I chose to use Glue Arts ribbon adhesive to attach this ribbon. Simply measure and cut your ribbon. Cut a piece of the adhesive and put on the outside edge of both sides, on the backside, of the ribbon. Use a Popsicle stick and press down over the backing to make sure the adhesive really adheres to the ribbon before pulling the backing off.
Find some paper you love, measure and cut it to fit where you want. I double layered paper and then trimmed it with May Arts HA10 3/8" double faced satin.I used fast drying decoupage to glue the paper to the trunk. Make sure you go back over the top to seal it completely.
Here you see the 3/8" HA10 cut to fit around the edge of the paper I put in the middle.
To finish it off, instead of putting back in the ugly rope for the handles, I used the gorgeous......
NV10 1.5"x10y - FAUX SUEDE /RUFFLE EDGE
So, cute!! My girls were devastated when they saw I had painted the trunk black. I reassured them they would like it when it was finished. I will tell you I had awwwes and huge hugs. "Mom, it's soooo cute!"
There you have it. The plain wooden box turned 18" doll trunk.
Hello all! I've got a really fun, really cute and really simple project for you today!
We are going to transform this cute little felt bag into an extraordinary cute little felt bag with a coordinating present and card to boot! Let's get started.
Supplies used are: Little felt bag purchased from my local craft store for 99 cents, hot glue and gun, scissors, ruler, lighter card stock, 1/2" plastic headband, Ribbon NV27 1.5" ruffle RG17, 27, 34, 46 3/16" and a few other embellishments.
I decided I wanted to make a weave pattern on the front soI
started by cutting my first piece of ribbon at an angle, heat sealed with a lighter, and glued to bag.
Little Tip from a ribbon pro....
Heat sealing makes for nice clean ribbon edges that won't fray. Fray check only works short term. Every ribbon is a little different so when heat sealing a new ribbon make sure there's a little extra length. Grosgrain, satin and suede heat seal really well. It actually makes the ribbon melt which is what prevents the fraying. Thinner ribbons such as sheers etc. burn easily so hold your lighter further away or you may need to blow your ribbon out. Wink, wink! The cheaper the ribbon the more you'll have a problem. I love May Arts ribbon for this particular reason. It's a very exquisite product and even the thinner ribbons heat seal nicely with out melting to quickly. Don't let me scare you, just practice and you'll see what I mean about your nice edges. Candles will turn your ribbon black! Don't use a candle in my opinion. I have not had good success with them.
Now that the first layer of ribbons is glued on let's start the second layer. Felt melts too, so once you're done gluing the ribbon run your lighter up and down the edges to make the felt, ribbon and glue look nice and neat.
Instead of doing the criss-cross all over the bag I cut and glued ribbon straight and added some cute glitter butterflies to kind of give it the Merry Go Round look. I then added the yellow ruffle ribbon over the top all the way around. Having the additional cut piece of ribbon I glued to the inside gives it a nice clean look from the top.
Now, we will make a cute head band using the 1.5" ruffle ribbon.
I had technical difficulties with a few pictures so these next two will be with the Sea foam ruffle ribbon.
Head bands are usually about 14 inches from one end to the other.
Cut two pieces of ribbon, one 15 1/2" and the other 13 1/2".
Put hot glue just below the ruffle (top and bottom one side at a time) to glue your two pieces of ribbon together.
This will give you a pocket you can easily slide the headband through.
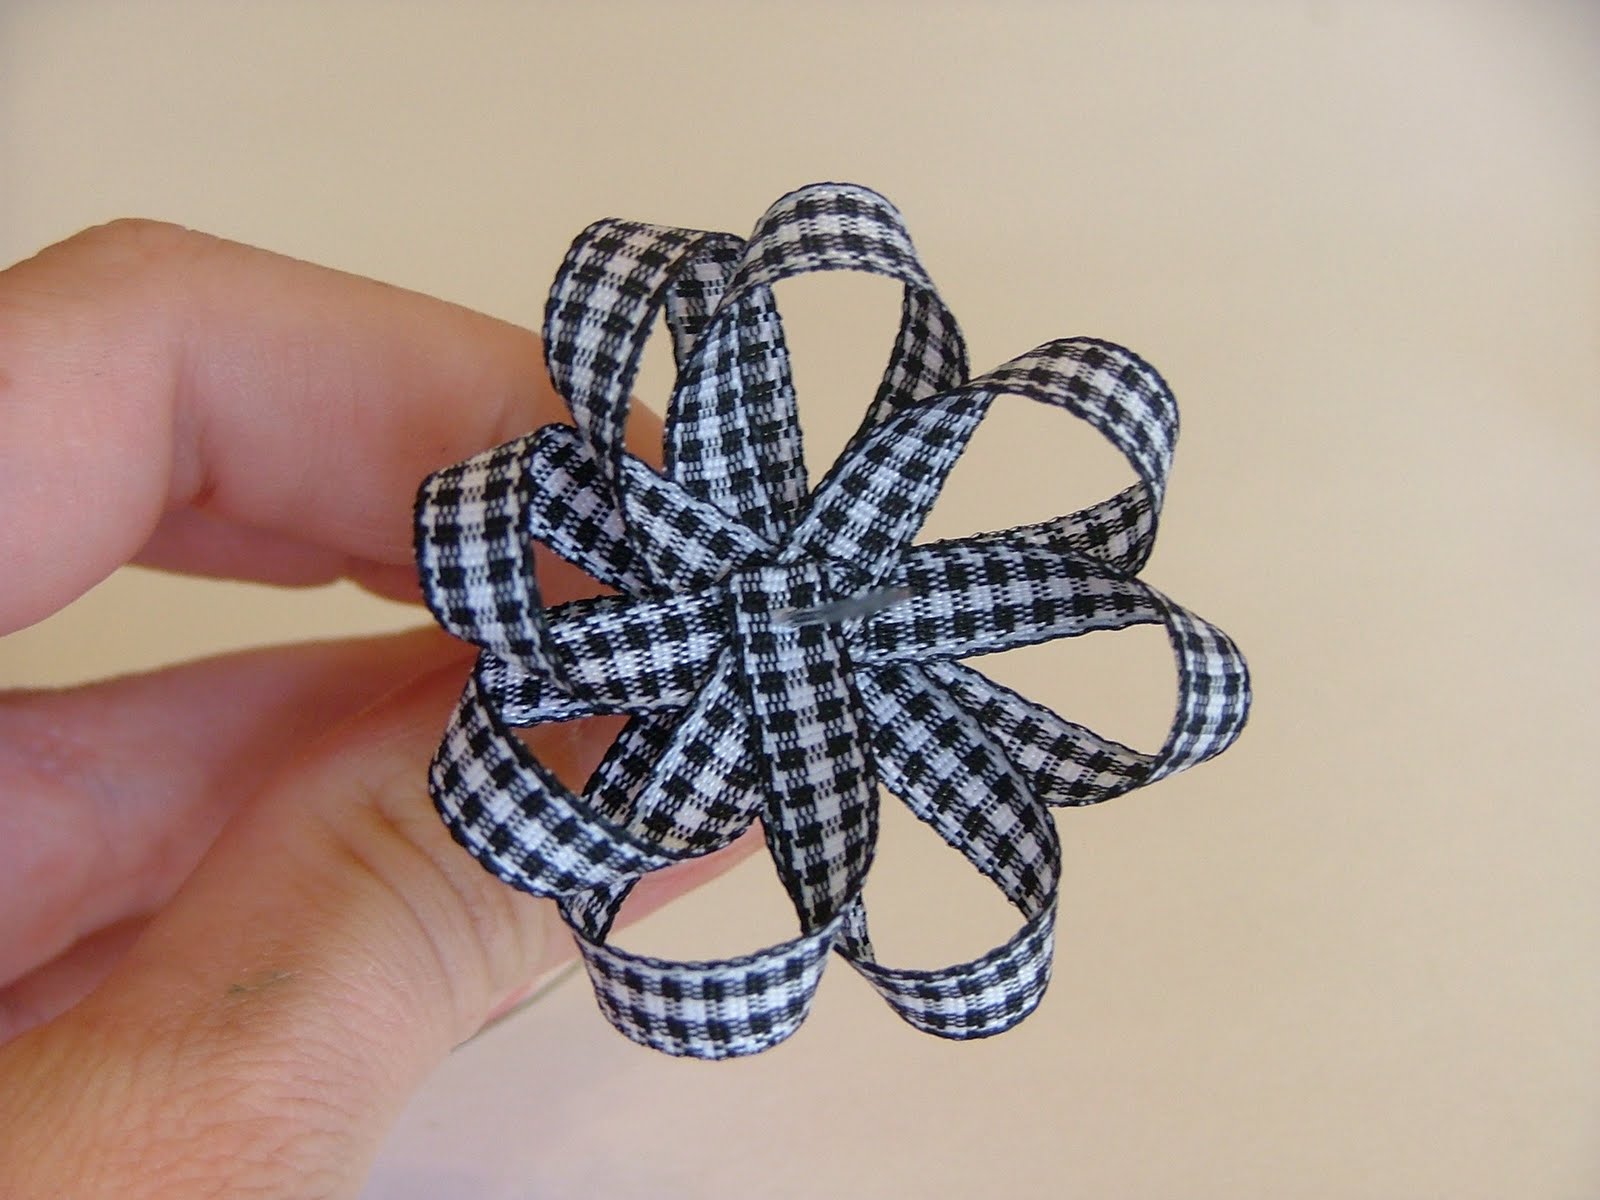
You will also need approximately 1 yard (depending on how full you want your flower) of uncut ribbon to create a second flower that will be glued beneath this one.
I used a large white scrap booking brad for the center.
A matching card made from DCWV's 12x12 glitter stack cut down to 5x8 1/2 card.
Cut and glue ribbon and butterflies, and add some sticker letters.
Here you have it! A really fun, really cute and really easy project! For the flower on the front of the hand bag I added some pictures that I did previously to show those who haven't seen this how I did it.
For more detailed instructions visit my website at www.andreasbowcottage.blogspot.com
Thanks for joining me today!! I hope you had fun and are inspired to create your own
I don't know about you but I love wood crafts, especially block letters! They are so fun and versatile. It always feels good to take all the Christmas stuff down, but what do you do for the interim between Christmas and Valentine's Day? Here's my solution.
Winter block letters.
These are pretty self explanatory, but I'll give you some info. on how I did these.
First, decide your color scheme. I chose to do both paint and paper in brown and blue, and of course finished off with some fabulous ribbon.
To save time, trace your letters on your paper first. Next paint your letters. While the letters are drying cut out the paper letters you traced.
Whip out the mod podge or what ever glue you prefer and attach your paper letters to you block letters.
Once the glue is dry, you can sand the edges of the paper where it bumps up to the edge of the wood block. This gives it a real finished touch. Next, pull out the gorgeous ribbon of your choice and measure and glue to your letters.
To give them some extra flair, I also made some ribbon flowers. The flowers are very simple to make and are really cute. You'll take your needle and thread and make straight line stitch. Once it's the length you want stitch it closed. I chose to double layer these with both the PV34, light blue velvet, and NY04, two tone stripes.
I also used ribbon 357-34-32 Ant. gold velvet corduroy. Gluing the ribbon around the outside gives the letters some added dimension.
I love how they turned out. I hope this inspires you to do something fun with some block letters or another wood craft.